“ELK”是三个开源项目的首字母缩写,这三个项目分别是:Elasticsearch、Logstash 和 Kibana。Elasticsearch 是一个搜索和分析引擎。Logstash 是服务器端数据处理管道,能够同时从多个来源采集数据,转换数据,然后将数据发送到诸如 Elasticsearch 等“存储库”中。Kibana 则可以让用户在 Elasticsearch 中使用图形和图表对数据进行可视化。
为了安全起见,Elasticsearch 不能以 root 用户启动,所以首先需要创建一个独立的 es 用户。
创建用户并设定密码:
useradd es
useradd -M es  # 创建用户但不创建家目录
passwd es
在官网下载指定版本的 Elasticsearch 到本地,然后解压,并完成重命名、赋权限。(本集群采用三主三从,每台机器运行一个 master,一个 node)
cd /data
wget https://artifacts.elastic.co/downloads/elasticsearch/elasticsearch-7.9.0-linux-x86_64.tar.gz
tar -xf elasticsearch-7.9.0-linux-x86_64.tar.gz
mv elasticsearch-7.9.0 elasticsearch_master
cp -R elasticsearch_master elasticsearch_node
chown -R es:es elasticsearch*
修改 master 节点的 elasticsearch.yml 文件:
cluster.name: es_cluster
# 集群的名称,只有名称相同才能加入集群
node.name: elasticsearch-master1
# 集群中的名称,必须唯一
node.master: true
# 允许成为 master 节点
path.data: /data/elasticsearch_master/data
path.logs: /data/elasticsearch_master/logs
# 定义数据和日志的目录
http.port: 9200
network.host: 0.0.0.0
# 允许所有 IP 访问,搭建完成再做更改
cluster.initial_master_nodes: ["10.26.5.22"]
# 定义初始化的主节点
discovery.zen.ping.unicast.hosts: ["10.26.5.22", "10.26.5.20", "10.26.5.26"]
# 集群内的所有节点的 IP
discovery.zen.minimum_master_nodes: 2
# 为了避免脑裂,集群节点数最少为半数+1
discovery.zen.ping_timeout: 60s
http.cors.enabled: true
http.cors.allow-origin: "*"
http.cors.allow-headers: "Authorization,X-Requested-With,Content-Length,Content-Type"
############################# 以下五行表示启用 xpack,安装好才加上 ####################
xpack.security.enabled: true
xpack.security.transport.ssl.enabled: true
xpack.security.transport.ssl.verification_mode: certificate
xpack.security.transport.ssl.keystore.path: /data/elasticsearch_master/config/elastic-certificates.p12
xpack.security.transport.ssl.truststore.path: /data/elasticsearch_master/config/elastic-certificates.p12
修改 node 节点的 elasticsearch.yml 文件:
cluster.name: es_cluster
node.name: elasticsearch-master1
node.data: true
node.master: false
path.data: /home/elasticsearch_node/data
path.logs: /home/elasticsearch_node/logs
http.port: 9201
network.host: 0.0.0.0
cluster.initial_master_nodes: ["10.26.5.22"]
discovery.zen.ping.unicast.hosts: ["10.26.5.22", "10.26.5.20", "10.26.5.26"]
discovery.zen.minimum_master_nodes: 2
discovery.zen.ping_timeout: 60s
http.cors.enabled: true
http.cors.allow-origin: "*"
http.cors.allow-headers: "Authorization,X-Requested-With,Content-Length,Content-Type"
############################# 以下五行表示启用 xpack,安装好才加上 ####################
xpack.security.enabled: true
xpack.security.transport.ssl.enabled: true
xpack.security.transport.ssl.verification_mode: certificate
xpack.security.transport.ssl.keystore.path: /data/elasticsearch_master/config/elastic-certificates.p12
xpack.security.transport.ssl.truststore.path: /data/elasticsearch_master/config/elastic-certificates.p12
修改 master 和 node 节点的 jvm.options 文件(不超过总内存的一半,本机内存 32 GB):
-Xms14g
-Xmx14g
在 GitHub 上下载 IK 分词器(跟 Elasticsearch 的版本保持一致)。
每台服务器上的 master 节点和 node 节点的 plugins 下都要有 ik 这个目录(手动创建):
wget https://github.com/medcl/elasticsearch-analysis-ik/releases/download/v7.9.0/elasticsearch-analysis-ik-7.9.0.zip
unzip /usr/local/src/elasticsearch-analysis-ik-7.9.0.zip -d ./plugins/ik
生成 SSL 连接需要的证书(只有使用统一证书的机器才能加入集群)。
在一台机器上生成,分发到其他机器:
cd /data/elasticsearch_master
./bin/elasticsearch-certutil ca  # 生成 ca 证书
# 保存 elastic-stack-ca.p12 路径并输入密码
./bin/elasticsearch-certutil cert --ca elastic-stack-ca.p12  # 生成客户端证书
# 保存 elastic-certificates.p12 路径并输入密码
将客户端证书分发到各个机器不同节点的 config 目录下。所有节点将密码添加至 elasticsearch-keystore:
bin/elasticsearch-keystore add xpack.security.transport.ssl.keystore.secure_password
bin/elasticsearch-keystore add xpack.security.transport.ssl.truststore.secure_password
启动各节点的 master 和 node(启动时应最先启动主节点,关闭时应最后关闭主节点):
/data/elasticsearch_master/bin/elasticsearch -d
/data/elasticsearch_node/bin/elasticsearch -d
配置 Elasticsearch 集群的相关密码:
./bin/elasticsearch-setup-passwords interactive
Initiating the setup of passwords for reserved users elastic, apm_system, kibana, logstash_system, beats_system, remote_monitoring_user.
You will be prompted to enter passwords as the process progresses.
Please confirm that you would like to continue [y/N] y
Enter password for [elastic]:
Reenter password for [elastic]:
Enter password for [apm_system]:
Reenter password for [apm_system]:
Enter password for [kibana]:
Reenter password for [kibana]:
Enter password for [logstash_system]:
Reenter password for [logstash_system]:
Enter password for [beats_system]:
Reenter password for [beats_system]:
Enter password for [remote_monitoring_user]:
Reenter password for [remote_monitoring_user]:
Changed password for user [apm_system]
Changed password for user [kibana]
Changed password for user [logstash_system]
Changed password for user [beats_system]
Changed password for user [remote_monitoring_user]
Changed password for user [elastic]
通过 curl 命令查看集群状态:
curl 'localhost:9200/_cat/master?v'
curl 'localhost:9200/_cat/nodes?v'
# 在设定密码后,需在 curl 后加上 --user 参数,输入用户名和密码
获取 X-pack 插件的全部功能(编辑两个 Java 文件,用经过编译的 class 文件后替换 jar 包中原来的 class 文件)。
在一台机器上进行即可,完成编辑操作后再分发到所有机器:
cat <<EOF > LicenseVerifier.java
package org.elasticsearch.license;
public class LicenseVerifier {
  public static boolean verifyLicense(final License license, byte[] publicKeyData) {
    return true;
  }
  public static boolean verifyLicense(final License license) {
    return true;
  }
}
EOF
cat <<EOF > XPackBuild.java
package org.elasticsearch.xpack.core;
import org.elasticsearch.common.SuppressForbidden;
import org.elasticsearch.common.io.PathUtils;
import java.io.IOException;
import java.net.URISyntaxException;
import java.net.URL;
import java.nio.file.Files;
import java.nio.file.Path;
import java.util.jar.JarInputStream;
import java.util.jar.Manifest;

public class XPackBuild {
  public static final XPackBuild CURRENT;
  static {
    CURRENT = new XPackBuild("Unknown", "Unknown");
  }

  @SuppressForbidden(reason = "looks up path of xpack.jar directly")
  static Path getElasticsearchCodebase() {
    URL url = XPackBuild.class.getProtectionDomain().getCodeSource().getLocation();
    try {
      return PathUtils.get(url.toURI());
    } catch (URISyntaxException bogus) {
      throw new RuntimeException(bogus);
    }
  }

  private String shortHash;
  private String date;

  XPackBuild(String shortHash, String date) {
    this.shortHash = shortHash;
    this.date = date;
  }

  public String shortHash() {
    return shortHash;
  }

  public String date() {
    return date;
  }
}
EOF
编译文件,经过编译后会出现两个与源文件同名的 class 文件,执行替换操作:
cd /data/elasticsearch_master/lib
javac -cp "./elasticsearch-7.9.0.jar:./lucene-core-8.6.0.jar:/data/elasticsearch_master/modules/x-pack-core/x-pack-core-7.9.0.jar" LicenseVerifier.java
javac -cp "./elasticsearch-7.9.0.jar:./lucene-core-8.6.0.jar:/data/elasticsearch_master/modules/x-pack-core/x-pack-core-7.9.0.jar:./elasticsearch-core-7.9.0.jar" XPackBuild.java

# 创建临时文件夹解压 jar
mkdir pack-tmp
# 将 x-pack-core-7.9.0.jar 复制到 elasticsearch 目录中
cp modules/x-pack-core/x-pack-core-7.9.0.jar pack-tmp
# 进入 pack-tmp 目录
cd pack-tmp
# 解压 x-pack-core
jar -xvf x-pack-core-7.9.0.jar
# 删除原 jar 文件
rm -rf x-pack-core-7.9.0.jar
# 删除原 class 文件,将新编译的拷贝到该位置
rm -rf org/elasticsearch/license/LicenseVerifier.class
cp ../LicenseVerifier.class org/elasticsearch/license/
# 重新打包
jar -cvf x-pack-core-7.9.0.jar ./*
# 再把 jar 包放回原来的位置
mv x-pack-core-7.9.0.jar ../../modules/x-pack-core/
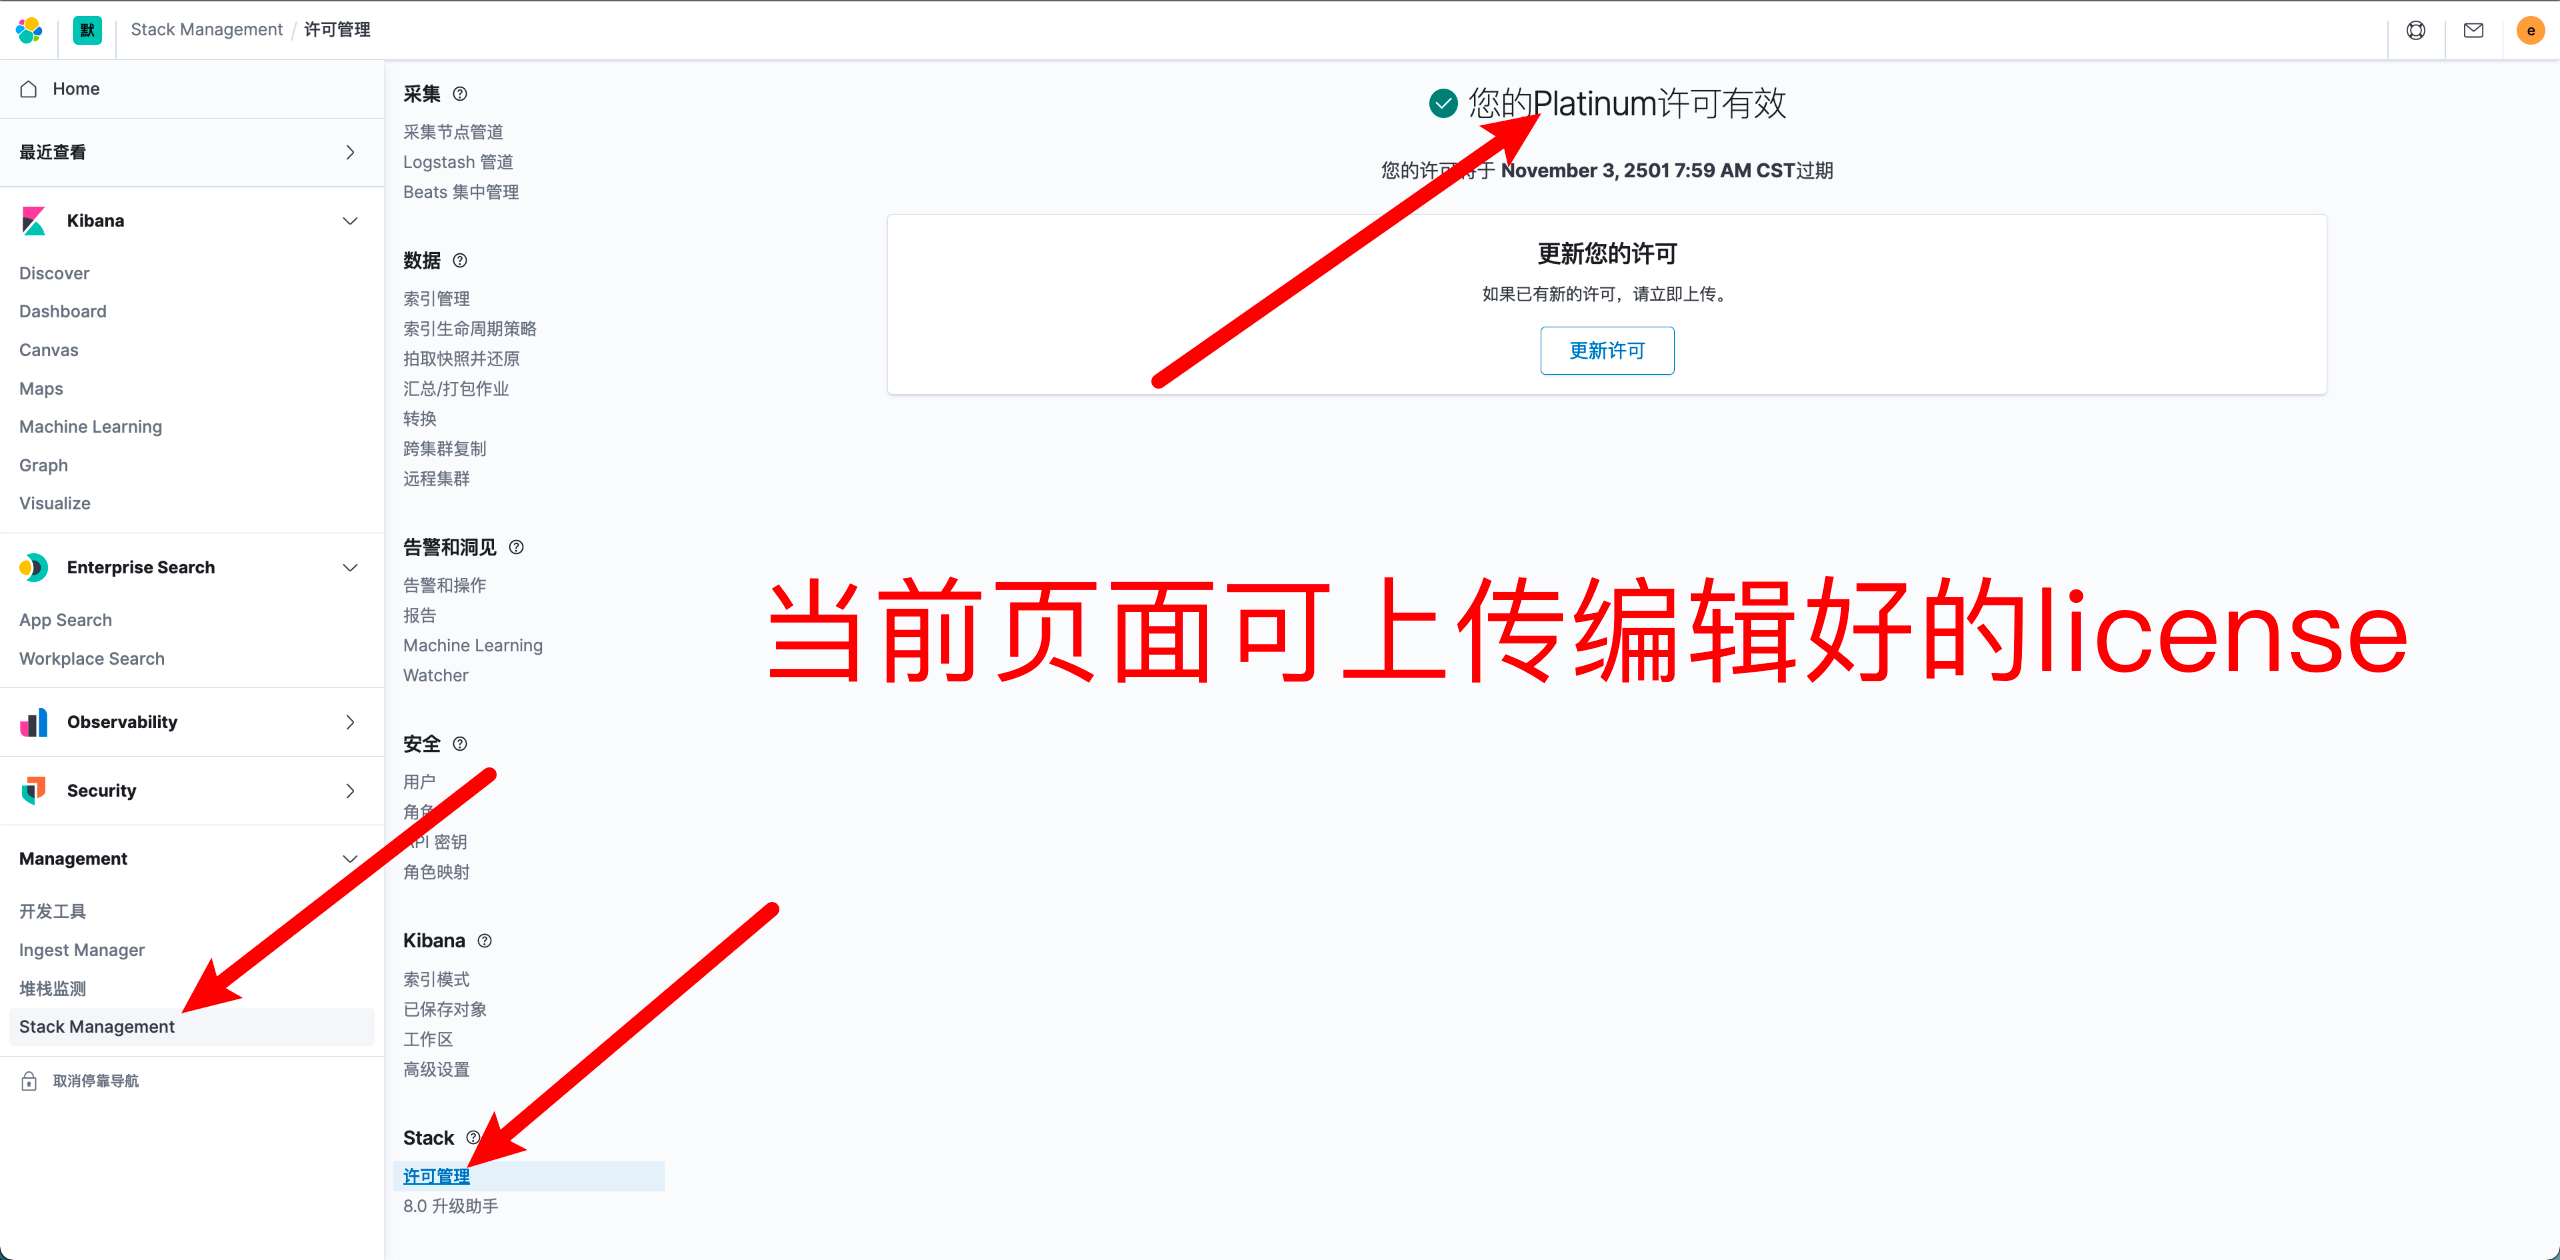
登录网址申请证书(不必填写真实的用户信息、公司信息,邮箱必须能收到邮件,下载邮件中的证书,修改证书内容):
{
  "license": {
    "uid": "39ec3cf3-0f0f-40c5-a031-9c0ac320b455",
    "type": "platinum",
    "issue_date_in_millis": 1646697600000,
    "expiry_date_in_millis": 16783199999990,
    "max_nodes": 100,
    "issued_to": "yates y (Oracle)",
    "issuer": "Web Form",
    "signature": "AAAAAwAAAA1CKtcT73AdiQMtATI/AAABmC9ZN0hjZDBGYnVyRXpCOW5Bb3FjZDAxOWpSbTVoMVZwUzRxVk1PSmkxaktJRVl5MUYvUWh3bHZVUTllbXNPbzBUemtnbWpBbmlWRmRZb25KNFlBR2x0TXc2K2p1Y1VtMG1UQU9TRGZVSGRwaEJGUjE3bXd3LzRqZ05iLzRteWFNekdxRGpIYlFwYkJiNUs0U1hTVlJKNVlXekMrSlVUdFIvV0FNeWdOYnlESDc3MWhlY3hSQmdKSjJ2ZTcvYlBFOHhPQlV3ZHdDQ0tHcG5uOElCaDJ4K1hob29xSG85N0kvTWV3THhlQk9NL01VMFRjNDZpZEVXeUtUMXIyMlIveFpJUkk2WUdveEZaME9XWitGUi9WNTZVQW1FMG1DenhZU0ZmeXlZakVEMjZFT2NvOWxpZGlqVmlHNC8rWVVUYzMwRGVySHpIdURzKzFiRDl4TmM1TUp2VTBOUlJZUlAyV0ZVL2kvVk10L0NsbXNFYVZwT3NSU082dFNNa2prQ0ZsclZ4NTltbU1CVE5lR09Bck93V2J1Y3c9PQAAAQC4D+zEzT3P3mxtad8tEC13WQB1iPbK33fryJnS8h+uNlqntrPrnVcpotb1HWHa/GKqtCGjskoQTT272NIwc+xZUFOOPc9qmafts35hsHO6Z7sj8GuPoEzZ1k9DIy/NAwfatNriH/ocg8gHL5eTyI8qK/kR8CHW78M+/AVuFIPYDIcapmmYm1/SlxqzOEpenOKzRRDSWto4lmp+adGmlot+UXkKYa2baIlj0jzDJSXSWwt5ukGOVs7bSxnpSnUjoyK66VjGXkeZqWbpqf7pMOC5FRlRv3fvOUxbgW1nup6SpWDmI8U5F6w527zQH4wY4nM6y7cxOiUqYpGuWDoP63WS",
    "start_date_in_millis": 1646697600000
  }
}
将 "type": "basic" 修改为 "type": "platinum","expiry_date_in_millis" 的数值改大一点,直接在末尾加个 0。
安装 Kibana(跟 Elasticsearch 的版本保持一致,只需安装在 node1 主机)并修改 kibana.yml:
wget https://artifacts.elastic.co/downloads/kibana/kibana-7.9.0-linux-x86_64.tar.gz
tar -xf kibana-7.9.0-linux-x86_64.tar.gz
cd /kibana-7.9.0/bin && nohup /data/kibana-7.9.0/bin/kibana --allow-root &
server.host: "0.0.0.0"
elasticsearch.hosts: ["http://10.26.5.22:9200", "http://10.26.5.20:9200", "http://10.26.5.26:9200"]
elasticsearch.username: "es的用户名"
elasticsearch.password: "es的密码"
kibana.index: ".kibana"
xpack.security.enabled: true
i18n.locale: "zh-CN"
此时访问本机 IP:5601。
