elasticsearch-dump、logstash、reindex、snapshot 方式进行数据迁移,实际上这几种工具大体上可以分为以下几类:
- scroll query + bulk:批量读取旧集群的数据然后再批量写入新集群,
elasticsearch-dump、logstash、reindex都是采用这种方式。 - snapshot:直接把旧集群的底层的文件进行备份,在新的集群中恢复出来,相比较 scroll query + bulk 的方式,
snapshot的方式迁移速度最快。
从源 ES 集群通过备份 API 创建数据快照,然后在目标 ES 集群中进行恢复,无网络互通要求、迁移速度快、运维配置简单、适用于数据量大,接受离线数据迁移的场景。Snapshot and restore 模块允许创建单个索引或者整个集群的快照到远程仓库。所以首先需要创建一个存储快照的地方,存储方案可以选择一个 NFS 的共享存储,或者对象存储。
方案对比
根据以上汇总出如下四种方案,并对其各项特点进行分析,最终选择适合我们自身的迁移方案。
| 方案 | elasticsearch-dump | reindex | snapshot | logstash |
|---|---|---|---|---|
| 基本原理 | 逻辑备份,类似 mysqldump 将数据一条一条导出后再执行导入 | reindex 是 Elasticsearch 提供的一个 API 接口,可以把数据从一个集群迁移到另外一个集群 | 从源集群通过 Snapshot API 创建数据快照,然后在目标集群中进行恢复 | 从一个集群中读取数据然后写入到另一个集群 |
| 网络要求 | 集群间互导需要网络互通,先导出文件再通过文件导入集群则不需要网络互通 | 网络需要互通 | 无网络互通要求 | 网络需要互通 |
| 迁移速度 | 慢 | 快 | 快 | 一般 |
| 适合场景 | 适用于数据量小的场景 | 适用于数据量不大,在线迁移数据的场景 | 适用于数据量大,接受离线数据迁移的场景 | 适用于数据量一般,近实时数据传输 |
| 配置复杂度 | 中等 | 简单 | 复杂 | 中等 |
方案测试
开始对以上各种方案进行测试对比,准备两台测试用的 Elasticsearch,要求有 Kibana、x-pack 白金版。
http://10.23.188.99:5601/  ### 一台在采集 /var/log/messages 日志的 ELK 全套
http://10.23.191.99:5601/  ### 一台空的 Elasticsearch
后面将以 188 和 191 区分二者。
测试:snapshot
因为只是测试,选择最基础的配置,在 Elasticsearch 的配置文件末尾加上 path.repo: ["/data/backup"],创建对应的文件夹,并且需要对 es 用户赋权限,因为我们的 Elasticsearch 是专门创建了一个 es 的用户去运行的,然后重启 Elasticsearch 生效。
访问 188 的 Kibana 的开发工具界面,执行以下操作:
# 这里注册了一个名为 backup 的共享文件系统仓库,快照会存储在 /home/backup 目录,需要给 es 用户所有权,不然创建失败
PUT _snapshot/backup
{
    "type": "fs",
    "settings": {
        "location": "/data/backup",
        "compress": true
    }
}
GET _snapshot?pretty    # 查看文件仓库创建的执行结果,?pretty 是美化返回结果
GET _snapshot/_all?pretty   # 查看所有的仓库

PUT /_snapshot/backup/snapshot_test   # 创建一个快照名叫 snapshot_test,它包含所有以 `messages_` 开头的索引,经过测试它是支持通配符的。
{
    "indices": "messages_*",
    "ignore_unavailable": "true",
    "include_global_state": false
}
各项参数解释:为了提高快照和恢复的速度,保证过程不出错,需要详细对每一项参数掌握。
以下是创建快照的可选参数:
| Setting | Description |
|---|---|
| indices | The indices you want to include in the snapshot. You can use , to create a list of indices, * to specify an index pattern, and - to exclude certain indices. Don’t put spaces between items. Default is all indices.(不建议把旧 ES 的 Kibana 索引制作快照同步到新 ES,会导致 Kibana 出错) |
| ignore_unavailable | If an index from the indices list doesn’t exist, whether to ignore it rather than fail the snapshot. Default is false. |
| include_global_state | Whether to include cluster state in the snapshot. Default is true. |
| partial | Whether to allow partial snapshots. Default is false, which fails the entire snapshot if one or more shards fails to store. 是否允许部分快照。默认为 false,如果一个或多个分片存储失败,则整个快照失败。 |
以下是设置快照仓库的可选参数:
| Setting | Description |
|---|---|
| location | 指定快照的存储位置。必须要有 |
| compress | 指定是否对快照文件进行压缩。默认是 true。 |
| chunk_size | 如果需要在做快照的时候大文件可以被分解成几块。这个参数指明了每块的字节数。也可用不同的单位标识。比如,1g,10m,5k 等。默认是 null(表示不限制块大小)。 |
| max_restore_bytes_per_sec | 每个节点恢复数据的最高速度限制。默认是 20mb/s |
| max_snapshot_bytes_per_sec | 每个节点做快照的最高速度限制。默认是 20mb/s |
以下是恢复快照的可选参数:
| Setting | Description |
|---|---|
| indices | The indices you want to restore. You can use , to create a list of indices, * to specify an index pattern, and - to exclude certain indices. Don’t put spaces between items. Default is all indices. |
| ignore_unavailable | If an index from the indices list doesn’t exist, whether to ignore it rather than fail the restore operation. Default is false. |
| include_global_state | Whether to restore the cluster state. Default is false. |
| include_aliases | Whether to restore aliases alongside their associated indices. Default is true. |
| partial | Whether to allow the restoration of partial snapshots. Default is false. |
| rename_pattern | If you want to rename indices as you restore them, use this option to specify a regular expression that matches all indices you want to restore. Use capture groups (()) to reuse portions of the index name. |
| rename_replacement | If you want to rename indices as you restore them, use this option to specify the replacement pattern. Use $0 to include the entire matching index name, $1 to include the content of the first capture group, etc. |
| index_settings | If you want to change index settings on restore, specify them here. |
| ignore_index_settings | Rather than explicitly specifying new settings with index_settings, you can ignore certain index settings in the snapshot and use the cluster defaults on restore. |
在开发工具界面看到执行成功后,可以前往刚才配置的仓库路径查看:
[root@network_test_elk home]# cd backup/
[root@network_test_elk backup]# ll
总用量 32
-rw-r--r--  1 es es 12931 1月   3 19:30 index-0
-rw-r--r--  1 es es     8 1月   3 19:30 index.latest
drwxr-xr-x 51 es es  4096 1月   3 19:30 indices
-rw-r--r--  1 es es   193 1月   3 19:30 meta-82OPqtLbS-y1sgz6hZBCuw.dat
-rw-r--r--  1 es es   419 1月   3 19:30 snap-82OPqtLbS-y1sgz6hZBCuw.dat
####################################这些就是创建一次快照产生的文件#############################################
[root@network_test_elk backup]# ll >ll.txt ### 将 ll 的结果保存到 ll.txt,然后第二条重新创建了一次快照,对比文件变化。
[root@network_test_elk backup]# ll
总用量 36
-rw-r--r--  1 es   es   12931 1月   3 19:30 index-0
-rw-r--r--  1 es   es       8 1月   3 19:30 index.latest
drwxr-xr-x 51 es   es    4096 1月   3 19:30 indices
-rw-r--r--  1 root root   383 1月   4 14:54 ll.txt
-rw-r--r--  1 es   es     193 1月   3 19:30 meta-82OPqtLbS-y1sgz6hZBCuw.dat
-rw-r--r--  1 es   es     419 1月   3 19:30 snap-82OPqtLbS-y1sgz6hZBCuw.dat
[root@network_test_elk backup]# ll
总用量 48
-rw-r--r--  1 es   es   17517 1月   4 14:54 index-1
-rw-r--r--  1 es   es       8 1月   4 14:54 index.latest
drwxr-xr-x 52 es   es    4096 1月   4 14:54 indices
-rw-r--r--  1 root root   383 1月   4 14:54 ll.txt
-rw-r--r--  1 es   es     193 1月   3 19:30 meta-82OPqtLbS-y1sgz6hZBCuw.dat
-rw-r--r--  1 es   es     193 1月   4 14:54 meta-e129JOLcScyCjseeC-K6Fg.dat
-rw-r--r--  1 es   es     419 1月   3 19:30 snap-82OPqtLbS-y1sgz6hZBCuw.dat
-rw-r--r--  1 es   es     420 1月   4 14:54 snap-e129JOLcScyCjseeC-K6Fg.dat
[root@network_test_elk backup]# cat ll.txt
总用量 32
-rw-r--r--  1 es   es   12931 1月   3 19:30 index-0
-rw-r--r--  1 es   es       8 1月   3 19:30 index.latest
drwxr-xr-x 51 es   es    4096 1月   3 19:30 indices
-rw-r--r--  1 root root     0 1月   4 14:54 ll.txt
-rw-r--r--  1 es   es     193 1月   3 19:30 meta-82OPqtLbS-y1sgz6hZBCuw.dat
-rw-r--r--  1 es   es     419 1月   3 19:30 snap-82OPqtLbS-y1sgz6hZBCuw.dat
创建快照的工作已经完成,在 191 新建一个文件仓库(跟前一个的 ES 操作一样),重启后打开 Kibana 界面。
将刚才在另一台的快照文件通过 scp -r 发送到当前 ES,然后可以通过 Kibana 查看快照是否被正常识别:
GET _snapshot/backup/_all?pretty
# 查看所有的快照
POST _snapshot/backup/snapshot_test/_restore?pretty
# 恢复 snapshot_test 这个快照
其实在 Kibana 的开发工具的操作,也是可以通过可视化界面通过鼠标操作实现。测试中一共导入了 85M,50 个索引,制作快照和恢复快照的时间累计不超过五秒。虽然 snapshot 是最快的方案,但是仍要对其速度有所了解,准备一个 1G 的索引再次测试。
测试:elasticsearch-dump
elasticsearch-dump 是一个开源的 Elasticsearch 数据迁移工具,详细信息请参见 elasticsearch-dump 官方文档。
安装:
yum install nodejs -y
yum install npm -y
npm install elasticdump -g
在网络 ELK 中选取一个大小为 1G 的索引,用 elasticdump,填写基本用户认证开始测试:
elasticdump \
  --input=http://name:passw@localhost:9200/netops_pa_device-2022-12-15 \
  --output=http://name:passw@10.23.191.99:9200/netops_pa_device-2022-12-15 \
  --type=mapping
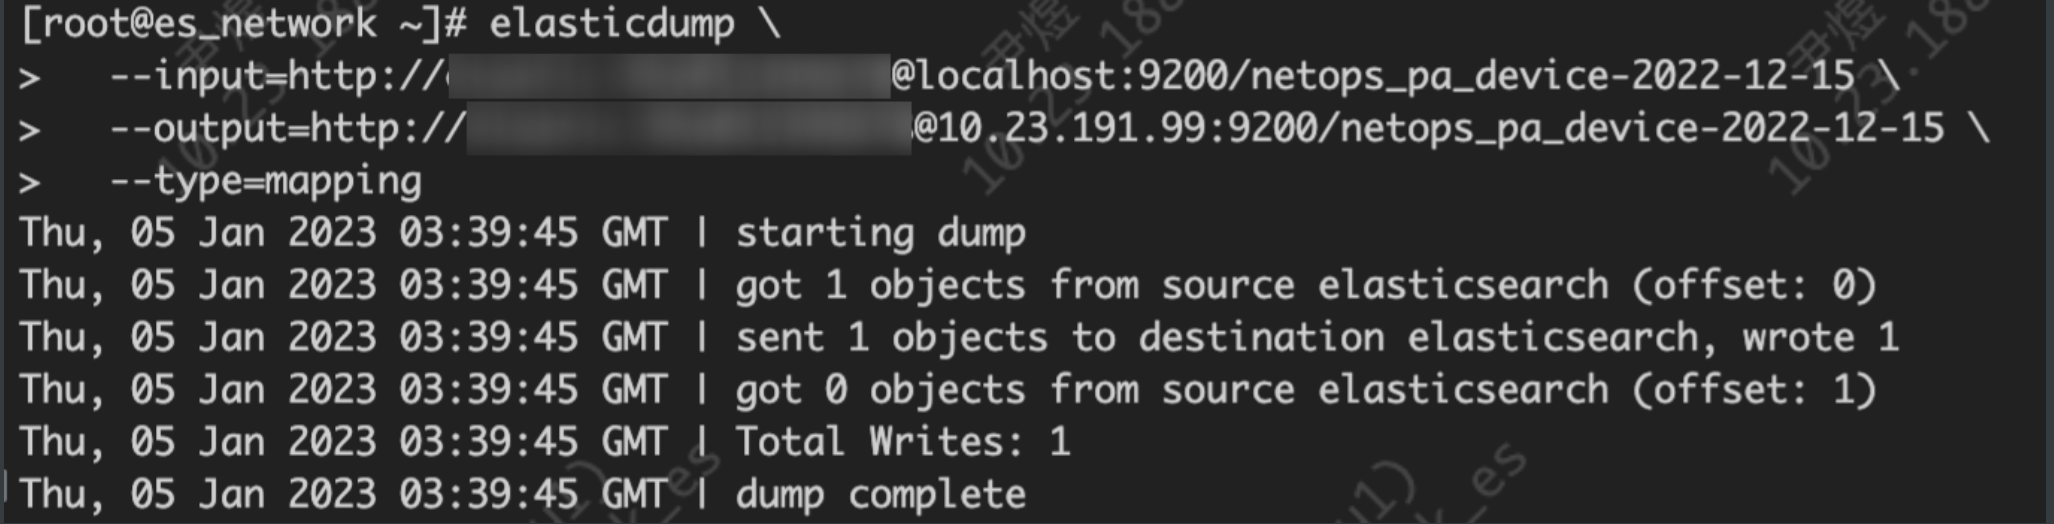
直接从原 ES 导入到新 ES,导入 mapping 用户基本可以忽略:
elasticdump \
  --input=http://name:passw@localhost:9200/netops_pa_device-2022-12-15 \
  --output=http://name:password@10.23.191.99:9200/netops_pa_device-2022-12-15 \
  --type=data
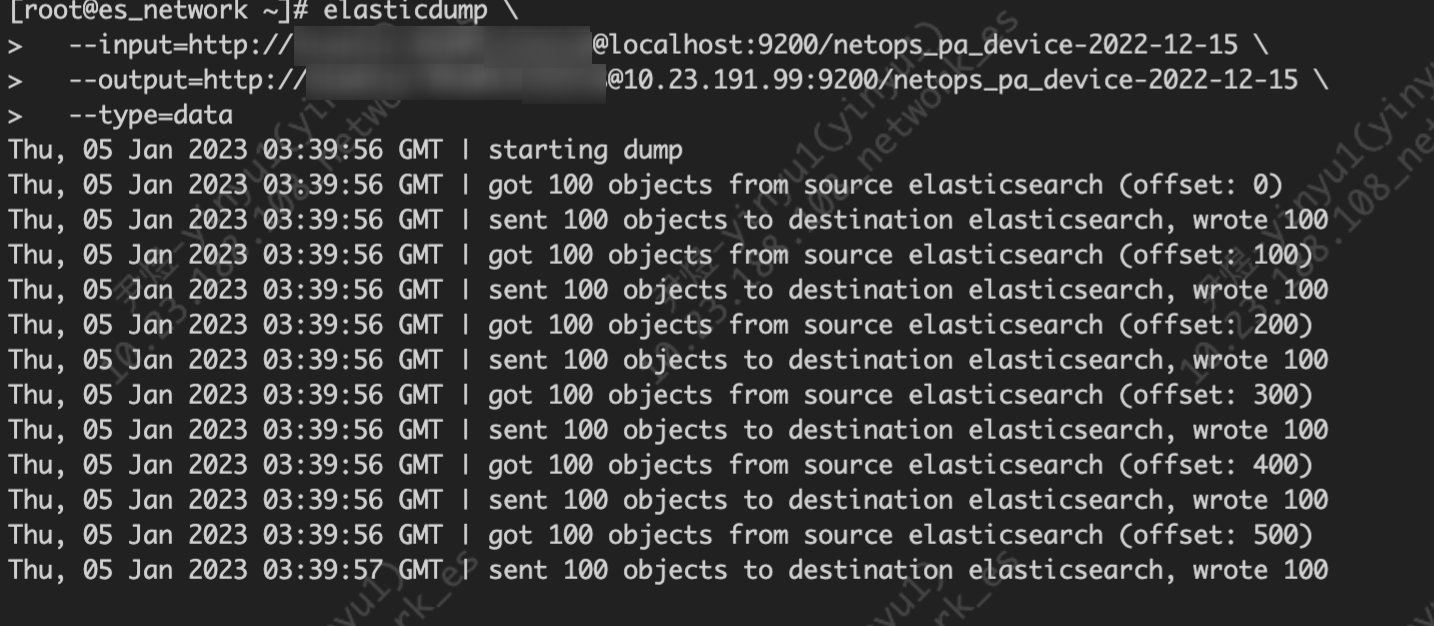
导入 1G 索引的 data,用时十分漫长。由于时间太长,会话中断后,传输也会被中断,于是我们借助一个工具:
yum install screen -y
screen 是一个非常有用的命令,提供从单个 SSH 会话中使用多个 shell 窗口(会话)的能力。当会话被分离或网络中断时,screen 会话中启动的进程仍将运行,你可以随时重新连接到 screen 会话:
screen -S session_name           # 新建一个叫 session_name 的 session
screen -ls(或者 screen -list)   # 列出当前所有的 session
screen -r session_name            # 回到 session_name 这个 session
screen -d session_name           # 远程 detach 某个 session
screen -d -r session_name        # 结束当前 session 并回到 session_name 这个 session
具体操作如下:
#!/bin/sh
echo `date` >~/dump.log
elasticdump \
  --input=http://elastic:Xhs@12345678@localhost:9200/netops_pa_device-2022-12-15 \
  --output=http://elastic:Xhs@12345678@10.23.191.99:9200/netops_pa_device-2022-12-15 \
  --type=mapping >>~/dump.log

elasticdump \
  --input=http://elastic:Xhs@12345678@localhost:9200/netops_pa_device-2022-12-15 \
  --output=http://elastic:Xhs@12345678@10.23.191.99:9200/netops_pa_device-2022-12-15 \
  --type=data >> ~/dump.log

echo `date` >>~/dump.log
用 screen 新建一个会话,在会话中执行这个脚本。最后将两个时间相减就能够得到整体的运行耗时:
[root@es_network ~]# grep 日 dump.log
2023年 01月 05日 星期四 13:05:59 CST
2023年 01月 05日 星期四 20:03:48 CST
七小时后终于把 1GB 的索引传到了新的 ES。
测试:logstash
迁移全量数据
input{
    elasticsearch{
        # 源端 ES 地址。
        hosts =>  ["http://localhost:9200"]
        # 安全集群配置登录用户名密码。
        user => "xxxxxx"
        password => "xxxxxx"
        # 需要迁移的索引列表,多个索引以英文逗号(,)分隔。
        index => "kibana_sample_data_*"
        # 以下三项保持默认即可,包含线程数和迁移数据大小和 Logstash JVM 配置相关。
        docinfo=>true
        slices => 5
        size => 5000
    }
}

filter {
  # 去掉一些 Logstash 自己加的字段。
  mutate {
    remove_field => ["@timestamp", "@version"]
  }
}

output{
    elasticsearch{
        # 目标端 ES 地址
        hosts => ["http://8.8.8.8:9200"]
        # 安全集群配置登录用户名密码。
        user => "elastic"
        password => "xxxxxx"
        # 目标端索引名称,以下配置表示索引与源端保持一致。
        index => "%{[@metadata][_index]}"
        # 目标端索引 type,以下配置表示索引类型与源端保持一致。
        document_type => "%{[@metadata][_type]}"
        # 目标端数据的 id,如果不需要保留原 id,可以删除以下这行,删除后性能会更好。
        document_id => "%{[@metadata][_id]}"
        ilm_enabled => false
        manage_template => false
    }
}
迁移增量数据
input{
    elasticsearch{
        # 源端 ES 地址。
        hosts =>  ["http://localhost:9200"]
        # 安全集群配置登录用户名密码。
        user => "xxxxxx"
        password => "xxxxxx"
        # 需要迁移的索引列表,多个索引使用英文逗号(,)分隔。
        index => "kibana_sample_data_logs"
        # 按时间范围查询增量数据,以下配置表示查询最近 5 分钟的数据。
        query => '{"query":{"range":{"@timestamp":{"gte":"now-5m","lte":"now/m"}}}}'
        # 定时任务,以下配置表示每分钟执行一次。
        schedule => "* * * * *"
        scroll => "5m"
        docinfo=>true
        size => 5000
    }
}
filter {
  # 去掉一些 Logstash 自己加的字段。
  mutate {
    remove_field => ["@timestamp", "@version"]
  }
}
output{
    elasticsearch{
        # 目标端 ES 地址
        hosts => ["http://8.8.8.8:9200"]
        # 安全集群配置登录用户名密码。
        user => "elastic"
        password => "xxxxxx"
        # 目标端索引名称,以下配置表示索引与源端保持一致。
        index => "%{[@metadata][_index]}"
        # 目标端索引 type,以下配置表示索引类型与源端保持一致。
        document_type => "%{[@metadata][_type]}"
        # 目标端数据的 id,如果不需要保留原 id,可以删除以下这行,删除后性能会更好。
        document_id => "%{[@metadata][_id]}"
        ilm_enabled => false
        manage_template => false
    }
}
Logstash 的迁移速度跟正常发送差不多,相对来说也是很慢的。
测试:reindex
ES 在创建好索引后,mapping 的 properties 属性类型是不能更改的,只能添加。如果说需要修改字段就需要重新建立索引然后把旧数据导到新索引。这时候就可以用 reindex。
首先为新的索引新建一个 mapping,mapping 中可以修改你要修改的字段的类型,再加入以下内容,优化导入效率。
修改了 number_of_replicas 和 refresh_interval。
设置
number_of_replicas为 0 防止我们迁移文档的同时又发送到副本节点,影响性能。
设置refresh_interval为 -1 是限制其刷新。默认是 1 秒。
当我们数据导入完成后再把上面两个值进行修改即可。
POST /_reindex
{
  "source": {
    "index": "topic"
  },
  "dest": {
    "index": "topic-new"
  }
}
以上是 reindex 在同一集群中的使用,在跨集群时也能用于索引迁移。
在目标 ES 集群中配置 elasticsearch.yml 中的 reindex.remote.whitelist 参数,指明能够 reindex 的远程集群的白名单。
和同集群数据迁移基本一样,就是多了一个设置白名单而已。
设置好索引、number_of_replicas: 0、refresh_interval: -1
在 remote 中设置远程集群的地址与账号密码(如果配置了的话)。
也可以添加 query 属性,只查询符合条件的。
在新机器的 Kibana 开发工具界面执行如下操作,实测 1GB 索引导入用时 10 分钟:
POST _reindex
{
  "conflicts": "proceed",
  "source": {
    "remote": {
      "host": "http://10.23.188.108:9200",
      "username": "elastic",
      "password": "**********",
      "socket_timeout": "1m",
      "connect_timeout": "1m"
    },
    "index": "netops_pa_device-2022-12-15",
    "size": 5000
  },
  "dest": {
    "index": "netops_pa_device-2022-12-15"
  }
}
完成之后记得重新配置 number_of_replicas、refresh_interval:
Using wait_for_completion=false as query param will return the task id and you will be able to monitor the reindex progress using GET /_tasks/<task_id>.
In order to improve the speed, you should reduce the replicas to 0 and set refresh_interval=-1 in the destination index before reindexing and reset the values afterwards.